How to Make a Cookie Tree

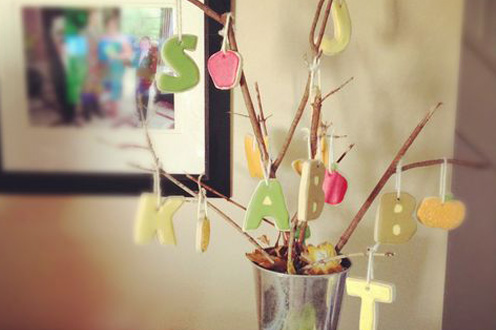
When we gather with our family for extended holiday meals, the kids almost always end up sitting at their own table because there are so many of them. They don’t mind at all, and I dare say the cousins have quite a lot of fun without the adults seated next to them. At our recent Thanksgiving dinner, I made a cookie tree for the centre of their table, and it was such a hit with the kids that I plan on making a holiday-themed one for our December gathering.
A cookie tree is exactly what it sounds like: homemade cookies that hang from the branches of a makeshift tree. As you can see in the photo, I used a galvanized metal vase and inserted branches that I had collected from outside. I filled the vase with granulated sugar, which holds the branches in place perfectly, and covered them with leaves, although for the winter holiday version I will leave it as it is, so it looks like snow is covering the base of the tree.
Here are the remainder of the instructions for making your own sweet tree this season:
1) I made my sugar cookies three weeks before the dinner. There is enough to keep you busy in the days leading up to a big holiday that I’m sure you can think of other things that will need your attention more than cookies. Take a free afternoon a few weeks before the big day and whip up a batch, cutting them into shapes that match the theme of your event. This year I’m thinking of cutting out mittens and writing the initials of each child on the cookie, or I may just do their initials like I did before. If you were looking for a more festive flavour of cookie, gingerbread would be perfect for this project.
2) Before baking the cookies, use a straw to poke a small hole in the top of the cookie. This will be where you thread the string or ribbon that you use to hang them. Make sure it isn’t too close to the top of the cookie; I make my holes 1/4′ down from the top. Bake the cookies as per the recipe and store them in an airtight container in the freezer until you need them for decorating.
3) Make the royal icing one week before decorating. My friend Marian over at Sweetopia assures me this is okay. Because I used her recipe, which is made with meringue powder and not egg whites, it can be stored in a lidded container at room temperature. Colour your icing at this point, or do it just before using it. Keep in mind that most colours will darken as they sit so it’s always better to tint your icing a little lighter than you might want the end result to be. Also, store the different colours in separate containers to keep them from mixing.
4) Two or three days before your party/holiday collect a few branches. Dig out a tall container (as mentioned I used a galvanized metal one that I had picked up at the dollar store) and fill it almost full with granulated sugar. Insert the sticks into the sugar, positioning them however you like. The sugar will hold them in place. To me, it looked like the branches were in snow so I covered mine with leaves from my front yard. For winter holidays I would leave it as is…it will look pretty and seasonal.
5) A few days before you need your tree, remove the cookies from the freezer and decorate them with the icing. Allow the cookies to dry for a minimum of 8 hours in a non-humid space. Slide the dried cookies onto your ribbon/yarn/string and tie a double knot at the top. Hang the cookies from the branches, spreading them out evenly over the tree.
I think this would be a brilliant addition to any birthday party as well. Just cut out cookies that match the theme of the party, or go with something fun and festive like balloon-shaped cookies paired with ones that are cut out in the number of the birthday child.


