Treat Bag Tricks

If you’re planning on taking your kids out trick or treating this year, help them get ready for the big night by making Halloween treat bags.
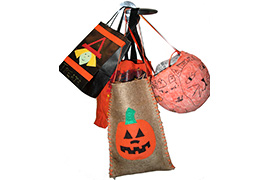
To get started, choose an old gift bag in a solid colour. Small gift bags are great—the kids will get a kick out of having their bags ‘almost full’ at the end of the night. Provide decorating supplies such as papers, markers, and crayons in black, green, orange, and white to give the bags a Halloween theme. The kids can draw or paste on cats, bats, pumpkins or witch faces; or they might choose a random collage of papers and markings.
Plain fabric bags make a great start to personalized painted treat bags. Use (washable) paints to get started, and add sparkles, Halloween stamps, or orange and black ribbons.
For bigger kids, there’s nothing more exciting than starting with a few scraps and transforming them into something usable. Stitching a bag together will exercise fine motor skills, and it’s easy to do: fold a piece of burlap in half, and use orange yarn strung onto a large darning needle to stitch up the sides. Use felt shapes to accessorize the bag, and string a ribbon handle through at the top.
Reach into the recycling bin for supplies to make paper mache Halloween buckets. Use a balloon as your bucket form (we taped ours into a bowl for stability), and make paste by mixing 1-part flour with 1.5-parts warm water. Rip old newspapers or other papers into shreds, and dip them into the paste, covering the balloon in at least two layers of paper. Let your bucket dry, pop the balloon, and add handles by punching a hole through the top edges of the bucket. Decorate the bucket with markers or paints.
The excitement of Halloween is a great opportunity for some hands-on fun. Your princesses and super heroes will strut down the streets with pride on Halloween night, as they tote their hand-made creations along.


