The Mouthwatering Cake

You’ll Need
- For the cake
- 2 – 8” cakes, any flavour
- 3 cans vanilla icing
- Pink, orange and green gel food colouring
- Chocolate chips
- For the ant candles
- 1–5” white taper candle
- Black Model Magic
- 1–5” piece copper wire
- Black paint
- Glue gun and glue
Prep and Cook
- Bake cakes as per recipe or package directions. For the cake, do the following:
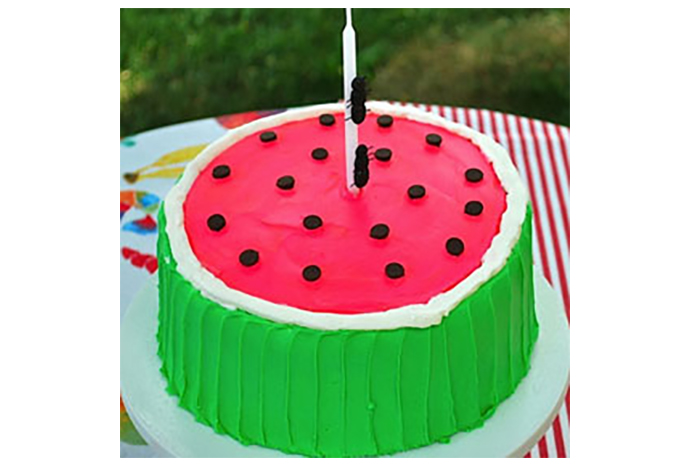
- Tint one can of frosting using the pink and orange colouring (equal amounts of each until you reach the desired colour).
- Tint one can of frosting using the green colouring.
- Set aside ¼ cup of the white icing. Place one cake on a cake board and cover with ½ cup of white frosting. Top with the second cake, and frost the outside (top and sides) with the remaining white icing.
- Frost the sides of the cake with the green icing. Once it’s spread smoothly, run a palette knife or the back of a spoon up the sides of the cake to create parallel lines that mimic those on watermelon skin.
- Using the pink/orange frosting, spread it over the top of the cake leaving a ½ border of white icing visible.
- Place the reserved white icing in a piping bag or zip-top bag and cut a small hole in the end. Pipe a border around the exposed white icing on the cake.
- Decorate the top with chocolate chips (watermelon seeds) and insert the ant candle.
- Tip: Place the cake in the freezer for 15–30 minutes prior to each frosting. This will harden the cake and white icing, making it easier to spread the coloured icing over top.
- For the ant candles, do the following:
- For each ant, use the black Model Magic to make one small and two oval beads, approximately ½ inch in length. Allow the beads to dry for at least 24 hours.
- Paint the copper wire black. Once dry, cut it into 10 pieces, ½ inch long each.
- To connect the body, insert one piece of wire into one of the oval beads leaving half of the wire exposed. Place the second oval bead on top of the wire and press down to connect the two together. Repeat with another piece of the wire and the round bead (head).
- Using the remaining pieces of wire, insert two into the round bead for the antennas, and other six into the body for the legs.
- Using a glue gun and hot glue, attach the ant to the candle. Or look for a small plastic ant in the dollar store.


